Friday, 26 July 2013

Ribbon roses

Just like the fondant carrots these little roses are a great way to use up spare bits of fondant. They make very cute cupcake toppers but could also be used to decorate biscuits or full sized cakes. They are very easy to make and as they are made from fondant can be kept in a cool dry place for up to a month. If you have never used fondant before then check out the homemade fondant post for some useful tips. 


Begin by colouring your fondant using gel colouring. If you are going to make leaves to go with your roses then colour some fondant green. Remember when you are working with fondant to keep all icing that you are not using wrapped in cling film to prevent crusting. If you would like your fondant to harden quicker then knead a bit of Tylo powder into it before you begin. 

1. Begin by rolling your fondant out so that it is very thin (1-2mm thick)
2. Cut the rolled out fondant into thin strips. The small you cut your strips the smaller the ribbon rose will be. 
3. Fold your strip in half.
4. Roll the fondant along the length of the strip until your rose is the size you would like. Once the rose is finished then twist off the end. You can either roll your fondant so the folded or the open side becomes the face of the rose. I think both are beautiful but play around and see what you prefer.


I found some little leaves make these roses even prettier so here is how to make some very simple ones:

1. roll a small piece of fondant into a ball.
2. shape the ball into a triangular shape.
3. using a modelling tool or a cocktail stick to mark the central vein onto the leaf.
4. Your leaf is finished so store in a cool dry place until you are ready to use them.


I used my ribbon roses to decorate chocolate brownie cupcakes. They look great either with two little ones and a leaf or one larger one. If you give these a go then I would love to see how they turned out and what you used them to decorate. 


Happy baking xxx

Friday, 19 July 2013

Chocolate Brownie Cupcakes

I always make these cupcakes when people ask me to bake for them because they are such a crowd pleaser. I originally made them for my sister to take back to university for her friends (she had to run for her train so they definitely were not looking pretty when she got them to Oxford) recently I made them for my boyfriend to take in for his last tort lecture (he was given strict instructions to not run for his train!). I decorated these cupcakes with ribbon roses and tiny little fondant icing leaves.  

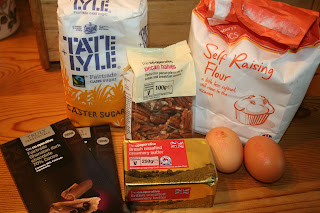
To make these lovelies you will need:
150g dark chocolate
150g unsalted butter
2 eggs
150g caster sugar
50g self raising flour
100g macadamia, pecan nuts or walnuts - chopped 

This makes 16 large cupcakes 

Begin by preheating the oven to 180 degrees or gas 4.  Line your muffin tin with cupcake cases.

Melt butter and chocolate together this can either be done in the microwave or in a glass bowl suspended over a pan of boiling water. Once the butter and chocolate is melted then use a mixer to beat in the eggs, sugar and flour. Your mixture should now look like this:


Stir in the chopped nuts and fill the cupcake cases just over half full. Bake in the oven for 17 minutes, remember these are brownie cupcakes so it is okay if they are a bit gooey when they come out the oven. 


Carefully transfer them to a cooling rack and make sure they are completely cold before icing them. I used a chocolate buttercream icing and a 1M wilton icing tip to decorate my cupcakes but use whatever your favourite combination is. 


Once you've finished icing then decorate with whatever sprinkles or fondant decorations you prefer and if the cupcakes are travelling to their intended consumer by train remind the carrier not to run. As always if you give this a go then I would love to see your pictures especially if you decorate yours differently. 


Happy baking xxx

Friday, 12 July 2013

Homemade Fondant Icing

There are loads of advantages to making your own fondant, its cheaper, tastier and you can create whatever colour you want. It is a bit of a messy job though so its worth making a large quantity as it keeps for a few months in the fridge if you wrap it in a double layer of clingfilm. 

You will need:
2kg of icing sugar
500g marshmallows
200g lard (trek/stork white/crisco)
3 tablespoons water


Place all the marshmallows in a microwave proof bowl and sprinkle the water over the top. Melt in the microwave for one and a half minutes. The marshmallows might not look that melted when they first come out the microwave but give them a good stir (using a rubber spatula) and you will see that they are: 


Place the lard and one kilogram of the icing sugar in your mixing bowl and add the melted marshmallow on top. Using the dough hook attachment mix all the ingredients until they are well incorporated. The mixture should begin to look like a dough. If it is still runny then add more icing sugar, I added nearly another 500g before I took the mixture out the bowl (I think it depends on the brand of icing sugar and lard to how much icing sugar you need). Once the mixture begins to look like dough then dust your work surface well with icing sugar and begin to knead the icing:


Keep kneading the icing until its soft but not sticky. I added nearly 500g more icing sugar to achieve this but it varies depending on humidity, product brands, hand warmth.... so judge it by thinking whether you would be able to model shapes/roll the icing out easily. Once you have finished kneading double wrap your icing in clingfilm. It will keep for a week or two outside the fridge and for four to six months in the fridge. 


A few fondant icing rules:
  • To colour fondant use gel food colouring. Place the colouring gel in the center of the piece of fondant and knead until the fondant is uniform in colour. 
  • When using fondant keep all icing that you are not working on wrapped in clingfilm as the icing gets a bit crusty quickly. 
  • Fondant takes quite a while to harden up (I normally leave it over night) so plan enough time for your project.
  • If you want your fondant to harden up quicker then knead a bit of tylose powder into it (I think this turns it into sugarpaste technically!)
  • If you store your fondant in the fridge then it will get very hard. Pop it into the microwave for 10 seconds or so to soften it up before kneading. 
For ideas of what to do with your lovely homemade fondant then check out these fondant carrots, perfect for decorating carrot cake, or these fondant mortar boards

If you make your own fondant icing then I would love to know how you get along and any tips you might have. 
Happy baking xxx

Friday, 5 July 2013

Vanilla Cheesecake

This cheesecake is a beautiful dessert for a special occasion and also really easy to make. I have previously made it for mothers day, watching the American elections and most recently for  the last meal before we moved out of our student house, every time I make it it gets a lot of love.  For a baked cheesecake it is very creamy and light so it is perfect after a big meal. I think it might have originated once upon a time from the Sainsbury's Magazine

For this recipe you will need:

60g butter
250g plain chocolate digestive biscuits
300g ricotta cheese
300g full fat soft cream cheese
150g caster sugar
3 large eggs
1 extra egg yolk 
1 vanilla pod (or 1 tsp vanilla essence)
150ml double cream
50g dark chocolate

You will also need  a 22cm cake tin with removable base,
baking paper, tin foil and a deep roasting tin. 


Firstly preheat your oven to 140 degrees or gas mark one and line your cake tin with baking paper (if you don't line your tin you will have to chisel your cheesecake off the tin and it doesn't look so pretty after that!)

Blitz your chocolate biscuits in a blender and melt your butter. Mix the two together and spoon into the cake tin. Spread the mixture so it covers all the tin and press down the mixture with a spoon to make it nice and even. The base of your cheesecake is now completed:


Mix the ricotta, cream cheese and sugar together using a mixer. Lightly beat the eggs and egg yolk and then add them to the mixture, beat until all the ingredients are well mixed. Scrape the seeds from the vanilla pod and add to the cream cheese mixture (or add your vanilla essence). In a separate bowl beat the double cream until it is thick enough to stand in soft peaks. Then very gently fold the cream into the other ingredients. The mixture should look like this:


Fill the kettle completely and put it on to boil, whilst it is boiling wrap the foil tightly around your tin (I tend to use two or three layers of foil). Put your wrapped tin in the baking tin and add you cream cheese mixture. Pour boiling water into the roasting tin until it comes halfway up the side of the cake tin:


Very carefully put the tin in the oven (on a practical note open the oven door before lifting the tin)  bake in the oven for an hour. Then switch off the oven and leave the cheesecake in the oven for another hour without opening the door. Once you remove the cheesecake allow it to completely cool before removing it from the tin and placing it on a plate. Don't worry if it cracks slightly, the chocolate decoration does a beautiful job of covering it up. Melt the dark chocolate and using a spoon dribble the melted chocolate across the cheesecake to decorate how you wish. Don't be tempted to use milk chocolate, it is not as runny when melted and this makes for a very frustrating decorating experience.


Happy baking xxx